為什麼需要 NTP?
ESP32 NTP 網路時鐘是 IoT 專案中最實用的時間同步方案。ESP32 沒有板載 RTC(即時時鐘)電池備援,每次斷電重啟後時間都會歸零。在 IoT 專案中,精確的時間戳記對以下場景至關重要:
- 感測器數據記錄:知道資料是何時採集的
- 排程控制:定時開關裝置、鬧鐘功能
- 安全認證:TLS 憑證驗證、Token 時效
- 分散式同步:多個 ESP32 節點時間一致
NTP(Network Time Protocol)是最廣泛使用的網路時間同步協定,能在區域網路內達到 sub-millisecond 精度,在網際網路上達到數毫秒精度。
NTP 協定工作原理
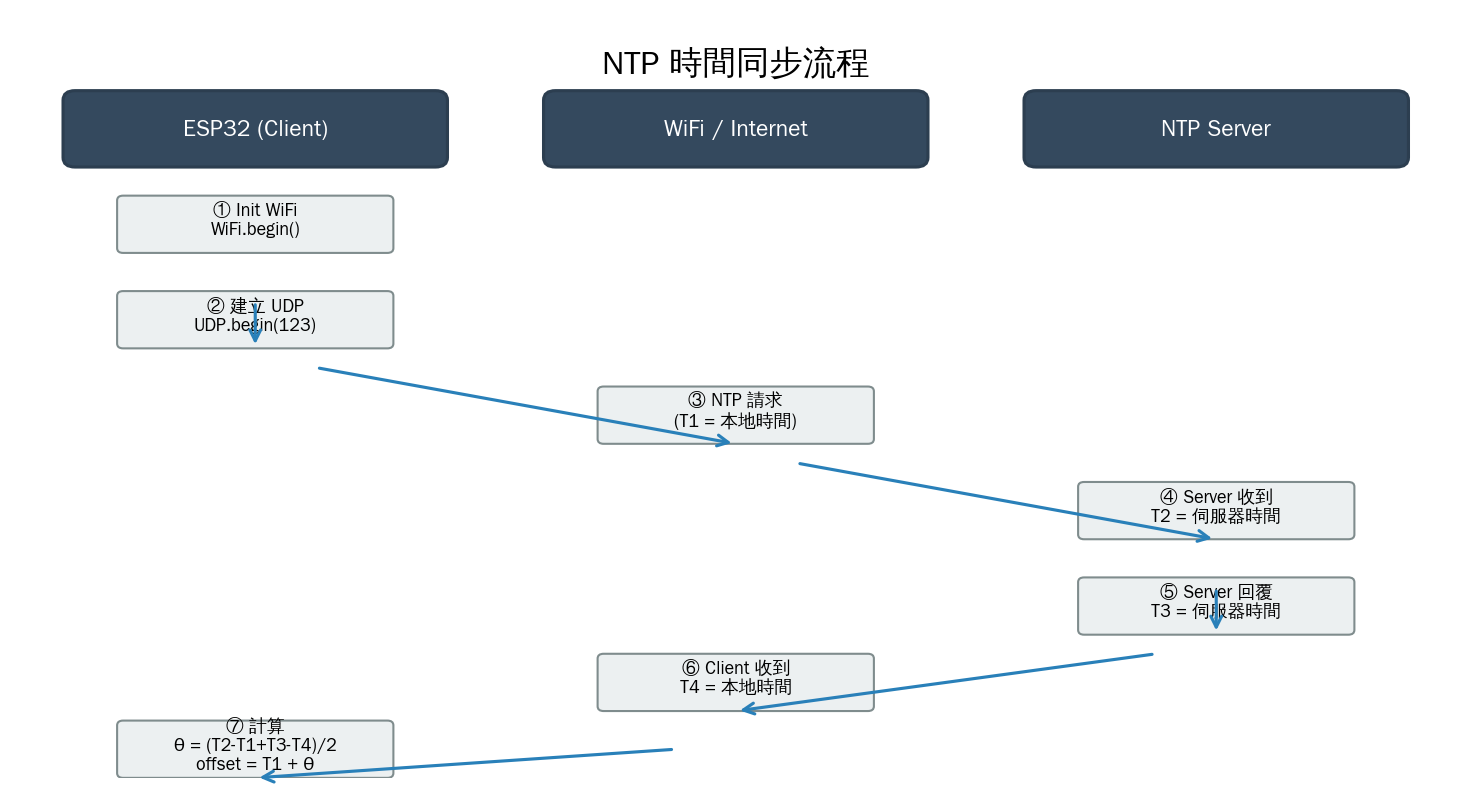
NTP 使用用戶端-伺服器架構,透過 UDP port 123 交換時間戳記。核心是四時間戳計算模型:

ESP32 發送 NTP 請求時記錄 T1(本地時間),NTP 伺服器收到請求記錄 T2,準備回覆時記錄 T3,ESP32 收到回覆記錄 T4。有了這四個時間戳,就能計算:
偏移量 θ = (T2 − T1 + T3 − T4) / 2
往返延遲 δ = (T4 − T1) − (T3 − T2)

校正後時間 = T1 + θ
這個演算法假設網路延遲是對稱的(上下行時間相等),實際誤差通常小於 50ms。
NTP 封包格式
NTP v4 封包固定 48 bytes,結構如下:

- LI (Leap Indicator, 2b):宣告閏秒(最後一分鐘 59/61 秒)
- VN (Version Number, 3b):NTP 版本,v4 = 100
- Mode (3b):3 = 用戶端,4 = 伺服器
- Stratum (8b):0 = 未同步,1 = 主時鐘(原子鐘/GPS),2-15 = 層級
- Root Delay / Dispersion:同步路徑總延遲與最大誤差
- Reference Timestamp:最後一次同步的時間
- Originate / Receive / Transmit Timestamp:四個時間戳中的三個(T1、T2、T3)
時間戳使用 64-bit 定點數:前 32 bit 為秒數(從 1900-01-01 起算),後 32 bit 為小數部分,理論精度約 232 皮秒。
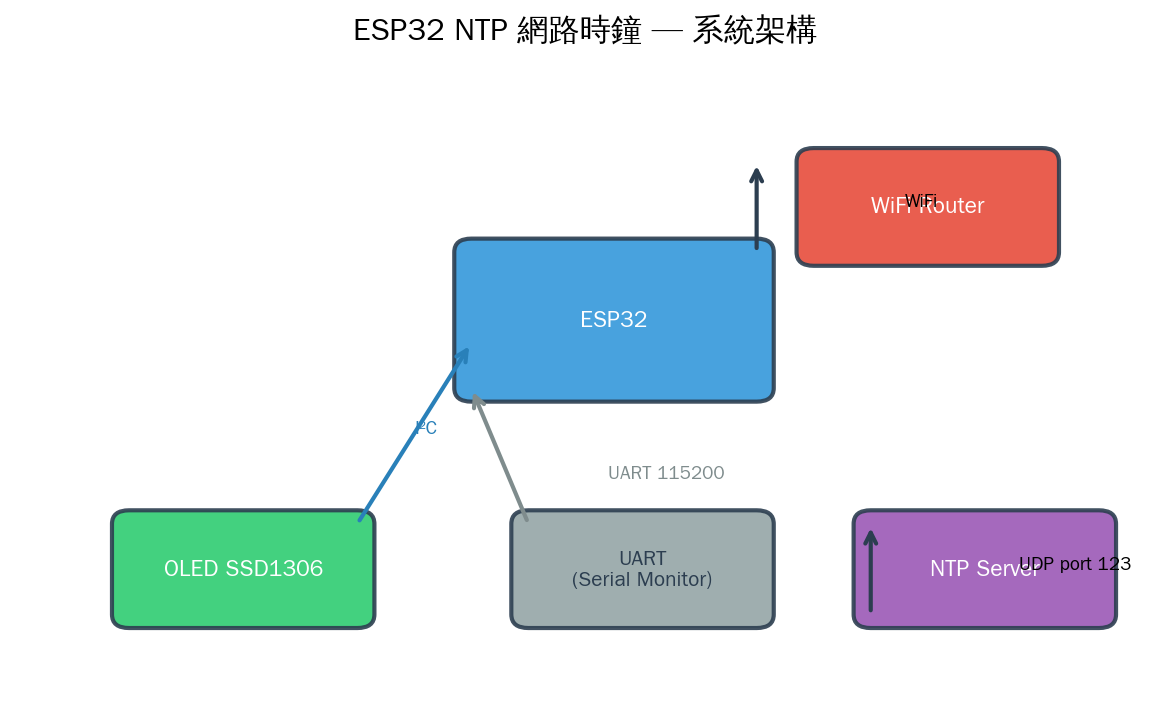
ESP32 + OLED SSD1306 硬體接線
| OLED SSD1306 | ESP32 | 說明 |
|---|---|---|
| VCC | 3.3V | 電源 (3.3V ~ 5V 皆可) |
| GND | GND | 共地 |
| SCL | GPIO 22 | I²C 時脈 |
| SDA | GPIO 21 | I²C 資料 |
SSD1306 使用 I²C 通訊,預設位址為 0x3C(或 0x3D,依模組而定)。透過送出指令設定頁面、欄位位置後,寫入 128×64 = 1024 bytes 的顯示緩衝區。

ESP32 NTP 客戶端:Arduino 實作
// ESP32 NTP 時間同步(使用 WiFiUDP)
#include
#include
const char* ssid = "YourSSID";
const char* password = "YourPassword";
WiFiUDP udp;
const char* ntpServer = "pool.ntp.org"; // NTP 伺服器池
const int localPort = 8888; // 本地 UDP 埠
// NTP 封包(48 bytes)
byte packetBuffer[48];
void setup() {
Serial.begin(115200);
WiFi.begin(ssid, password);
while (WiFi.status() != WL_CONNECTED) delay(500);
udp.begin(localPort);
sendNTPpacket(ntpServer);
}
void loop() {
int size = udp.parsePacket();
if (size >= 48) {
udp.read(packetBuffer, 48);
// 提取 T4 時間戳(第 40-43 bytes = 秒數,第 44-47 = 小數)
unsigned long secsSince1900 = 0;
secsSince1900 |= packetBuffer[40] << 24;
secsSince1900 |= packetBuffer[41] << 16;
secsSince1900 |= packetBuffer[42] << 8; secsSince1900 |= packetBuffer[43]; // NTP 紀元 1900 → Unix 紀元 1970 const unsigned long seventyYears = 2208988800UL; unsigned long timestamp = secsSince1900 - seventyYears; Serial.printf("NTP 時間: %lu\n", timestamp); Serial.printf("本地時間: %s", ctime((time_t*)×tamp)); delay(10000); // 每 10 秒同步一次 } } void sendNTPpacket(const char* server) { memset(packetBuffer, 0, 48); // LI=0, VN=4, Mode=3 (client) packetBuffer[0] = 0b11100011; // 0xE3 // 填入 T1(發送時間) unsigned long t1 = millis(); packetBuffer[40] = (t1 >> 24) & 0xFF;
packetBuffer[41] = (t1 >> 16) & 0xFF;
packetBuffer[42] = (t1 >> 8) & 0xFF;
packetBuffer[43] = t1 & 0xFF;
udp.beginPacket(server, 123); // NTP port
udp.write(packetBuffer, 48);
udp.endPacket();
}
使用 ESP32 內建 time() 函式(更簡單)
Arduino-ESP32 封裝了 SNTP 客戶端,直接使用標準 C 的 time() 和 localtime() 即可:
// ESP32 SNTP — 最簡方式同步時間
#include
#include

const char* ntpServer = "pool.ntp.org";
const long  gmtOffset_sec = 28800;     // UTC+8 (台灣/北京)
const int   daylightOffset_sec = 0;    // 不考慮夏令時間

void setup() {
    Serial.begin(115200);
    WiFi.begin("YourSSID", "YourPassword");
    while (WiFi.status() != WL_CONNECTED) delay(500);

    // 初始化 SNTP
    configTime(gmtOffset_sec, daylightOffset_sec, ntpServer);

    // 等待時間同步完成
    struct tm timeinfo;
    while (!getLocalTime(&timeinfo)) {
        Serial.println("等待 NTP 同步...");
        delay(1000);
    }
    Serial.println("時間同步完成!");
}

void loop() {
    struct tm timeinfo;
    if (getLocalTime(&timeinfo)) {
        char buf[64];
        strftime(buf, sizeof(buf), "%F %T (%A)", &timeinfo);
        Serial.println(buf);
    }
    delay(1000);
}
OLED 顯示時鐘(完整範例)
結合 SNTP + SSD1306 OLED,做出真正的網路時鐘:
// ESP32 NTP 網路時鐘 + OLED 顯示
#include
#include
#include
#include
#include

#define SCREEN_WIDTH 128
#define SCREEN_HEIGHT 64
#define OLED_RESET    -1
Adafruit_SSD1306 display(SCREEN_WIDTH, SCREEN_HEIGHT, &Wire, OLED_RESET);

const char* ssid     = "YourSSID";
const char* password = "YourPassword";
const char* ntpServer = "pool.ntp.org";
const long  gmtOffset = 28800;  // UTC+8

void setup() {
    Serial.begin(115200);

    // 初始化 OLED
    if (!display.begin(SSD1306_SWITCHCAPVCC, 0x3C)) {
        Serial.println("OLED 初始化失敗");
        while (1) delay(10);
    }
    display.clearDisplay();
    display.setTextSize(1);
    display.setTextColor(SSD1306_WHITE);

    // 連 WiFi
    display.setCursor(0, 0);
    display.println("Connecting WiFi...");
    display.display();

    WiFi.begin(ssid, password);
    while (WiFi.status() != WL_CONNECTED) delay(500);

    display.println("WiFi OK");
    display.display();

    // NTP 同步
    display.println("Syncing NTP...");
    display.display();

    configTime(gmtOffset, 0, ntpServer);

    struct tm timeinfo;
    while (!getLocalTime(&timeinfo)) {
        delay(500);
        display.print(".");
        display.display();
    }

    display.println("\nTime synced!");
    display.display();
    delay(1000);
}

void loop() {
    struct tm timeinfo;
    if (!getLocalTime(&timeinfo)) {
        display.clearDisplay();
        display.setCursor(0, 0);
        display.println("NTP Error!");
        display.display();
        delay(5000);
        return;
    }

    display.clearDisplay();

    // ---- 第 1 行:日期(置中) ----
    display.setTextSize(1);
    char dateBuf[32];
    strftime(dateBuf, sizeof(dateBuf), "%Y-%m-%d (%a)", &timeinfo);

    int16_t x1, y1;
    uint16_t w, h;
    display.getTextBounds(dateBuf, 0, 0, &x1, &y1, &w, &h);
    display.setCursor((SCREEN_WIDTH - w) / 2, 4);
    display.println(dateBuf);

    // ---- 第 2 行:時間(大字) ----
    display.setTextSize(3);
    char timeBuf[16];
    strftime(timeBuf, sizeof(timeBuf), "%H:%M:%S", &timeinfo);

    display.getTextBounds(timeBuf, 0, 20, &x1, &y1, &w, &h);
    display.setCursor((SCREEN_WIDTH - w) / 2, 22);
    display.println(timeBuf);

    // ---- 第 3 行:WiFi 狀態 + 運行時間 ----
    display.setTextSize(1);
    char wifiStr[32];
    snprintf(wifiStr, sizeof(wifiStr), "RSSI: %d dBm  UP: %lus",
             WiFi.RSSI(), millis() / 1000);
    display.getTextBounds(wifiStr, 0, 50, &x1, &y1, &w, &h);
    display.setCursor((SCREEN_WIDTH - w) / 2, 52);
    display.println(wifiStr);

    display.display();
    delay(500);  // 每 0.5 秒更新一次
}
進階:夏令時間自動切換
部分地區實施夏令時間(DST),可以動態調整:
// ESP32 自動偵測 DST(以歐洲/北美為例)
void setupTimeWithDST() {
    // 方法 1:使用 posix timezone string
    // 北美東部: EST5EDT,M3.2.0,M11.1.0
    // 歐洲中部: CET-1CEST,M3.5.0,M10.5.0/3
    // 台灣/中國: CST-8 (無 DST)

    setenv("TZ", "CST-8", 1);  // 台灣
    tzset();

    configTime(0, 0, "pool.ntp.org");
}
精度實測:NTP vs internal clock
| 計時方式 | 每日誤差 | 優點 | 缺點 |
|---|---|---|---|
| ESP32 internal millis() | ~10-30 秒 | 不需網路 | 隨溫度飄移 |
| NTP 同步(每小時) | < 10ms | 精度極高 | 需 WiFi |
| DS3231 RTC 模組 | ~1 秒/年 | 斷電保留 | 額外硬體成本 |
| GPS PPS | ~1μs | 原子鐘級 | 需 GPS 模組 + 天線 |
建議實務做法:NTP 每小時同步一次,其餘時間用 ESP32 內建 micros() 或 esp_timer 維持計時。
NTP 伺服器選擇
- pool.ntp.org:全球 DNS 輪詢,自動導向最近伺服器(推薦)
- time.google.com:Google 公共 NTP(GPS 參考)
- time.nist.gov:美國 NIST 官方(高精度)
- ntp.aliyun.com:阿里雲(中國大陸速度快)
- 自建 NTP Server:樹莓派 + 4G/GPS 模組
// 多伺服器備援
const char* ntpServers[] = {
    "pool.ntp.org",
    "time.google.com",
    "time.nist.gov"
};
configTime(gmtOffset, 0, ntpServers[0], ntpServers[1], ntpServers[2]);
搭配 Web Server 做配置頁面
結合之前介紹的 ESP32 Web Server,可以做出 WiFi 配置 + 時區設定網頁:
// Web Server + NTP 時鐘配置
#include

WebServer server(80);

String html = R"rawliteral(
<!DOCTYPE html>
<html>
<head>
<title>NTP 時鐘設定</title>
<meta name="viewport" content="width=device-width, initial-scale=1">
</head>
<body>
<h1>NTP 網路時鐘設定</h1>
<form action="/config" method="POST">
  SSID: <input name="ssid"><br>
  密碼: <input name="pass" type="password"><br>
  時區: <select name="tz">
    <option value="0">UTC</option>
    <option value="28800" selected>Asia/Taipei (UTC+8)</option>
    <option value="32400">Japan (UTC+9)</option>
  </select><br>
  <input type="submit" value="儲存">
</form>
<p id="clock"></p>
<script>
function updateClock() {
  fetch('/api/time')
    .then(r => r.json())
    .then(d => document.getElementById('clock').innerText = d.time);
}
setInterval(updateClock, 1000);
updateClock();
</script>
</body></html>
)rawliteral";

void handleConfig() {
    String ssid = server.arg("ssid");
    String pass = server.arg("pass");
    long tz = server.arg("tz").toInt();

    // 儲存到 Preferences / LittleFS
    // 重啟後套用新設定

    server.send(200, "text/plain", "設定已儲存,重新啟動中...");
    delay(1000);
    ESP.restart();
}

void setup() {
    server.on("/", handleRoot);
    server.on("/config", HTTP_POST, handleConfig);
    server.begin();
}
總結
NTP 是 IoT 專案中不可或缺的基礎服務。ESP32 的 SNTP 客戶端封裝了完整的 NTP v4 協定,只需 configTime() 一行就能同步時間。搭配 OLED 顯示器,短短幾十行程式就能做出實用的網路時鐘。
實務建議:每小時同步一次 NTP,平時使用 time() / getLocalTime() 讀取本地時間;若需要高精度計時(< 1ms),搭配 esp_timer 硬體定時器或 DS3231 RTC 模組。

文章評論