ESP32 HTTP/HTTPS REST API 用戶端
ESP32 作為 IoT 設備的核心任務之一就是將感測器資料上傳到雲端,或從雲端接收控制指令。透過 HTTP/HTTPS 協定與 RESTful API,ESP32 可以與各種後端服務(ThingSpeak、Firebase、AWS IoT、自建伺服器等)進行通訊。
本文將深入探索:
- HTTP GET/POST 請求與 JSON 資料交換
- TLS 1.2 安全加密連線(HTTPS)
- Arduino HTTPClient 與 WiFiClientSecure
- ESP-IDF esp_http_client 原生 API
- JSON 解析、記憶體管理與異常處理
- Cloud API 實戰:ThingSpeak + OpenWeatherMap
軟體架構

ESP32 的 HTTP 通訊從上到下分為五層:
- 應用層:感測器讀取、資料處理、業務邏輯
- HTTP 用戶端:Arduino HTTPClient 或 ESP-IDF esp_http_client
- TLS 安全層:mbedTLS 提供加密、證書驗證、金鑰交換
- TCP/IP 協定棧:LwIP 開源協定棧(TCP、DNS、DHCP)
- Wi-Fi:ESP32 內建 802.11 b/g/n 無線收發器
HTTP GET 請求

Arduino:HTTP GET 擷取資料
// ESP32 HTTP GET 請求(ThingSpeak 為例)
#include <WiFi.h>
#include <HTTPClient.h>

const char* ssid     = "你的WiFi名稱";
const char* password = "你的WiFi密碼";

void setup() {
    Serial.begin(115200);
    WiFi.begin(ssid, password);
    while (WiFi.status() != WL_CONNECTED) {
        delay(500);
        Serial.print(".");
    }
    Serial.println("
WiFi 已連線");
}

void loop() {
    if (WiFi.status() == WL_CONNECTED) {
        HTTPClient http;

        // 發送 GET 請求
        http.begin("http://api.thingspeak.com/channels/123456/feeds/last.json");
        int httpCode = http.GET();

        if (httpCode > 0) {
            Serial.printf("HTTP 狀態碼: %d
", httpCode);

            if (httpCode == HTTP_CODE_OK) {
                String payload = http.getString();
                Serial.println("回應內容:");
                Serial.println(payload);
            }
        } else {
            Serial.printf("HTTP 請求失敗: %s
", http.errorToString(httpCode).c_str());
        }

        http.end();  // 釋放資源
    }
    delay(30000);  // 30 秒查詢一次
}
使用 WiFiClient (底層 API)
// ESP32 原始 TCP Socket HTTP GET
#include <WiFi.h>

void httpGet(const char* host, const char* path) {
    WiFiClient client;
    if (!client.connect(host, 80)) {
        Serial.println("連線失敗!");
        return;
    }

    // 手動建立 HTTP 請求
    client.printf("GET %s HTTP/1.1
", path);
    client.printf("Host: %s
", host);
    client.print("Connection: close

");

    // 等待並讀取回應
    unsigned long timeout = millis();
    while (client.connected() && millis() - timeout < 5000) {
        while (client.available()) {
            String line = client.readStringUntil('
');
            Serial.println(line);
            timeout = millis();  // 重設超時
        }
    }
    client.stop();
}

void setup() {
    Serial.begin(115200);
    WiFi.begin("SSID", "PASSWORD");
    while (WiFi.status() != WL_CONNECTED) delay(500);
    httpGet("jsonplaceholder.typicode.com", "/todos/1");
}
HTTPS(TLS 安全連線)

HTTPS 在 HTTP 之上添加了 TLS 加密層,流程如下:
- TCP 三次握手:建立 TCP 連線(SYN, SYN+ACK, ACK)
- ClientHello:ESP32 發送支援的 TLS 版本、密碼套件清單
- ServerHello + Certificate:伺服器選擇密碼套件,發送憑證(含公鑰)
- ServerDone:伺服器通知握手階段結束
- ClientKeyExchange:ESP32 產生 Pre-Master Secret,用伺服器公鑰加密後發送
- CCS + Finished:雙方確認啟用加密,握手完成
- Application Data:加密傳輸 HTTP 請求/回應
完整 TLS 握手需 2 個 RTT(Round Trip Time),總共約 200~600ms。
Arduino:HTTPS 請求(憑證驗證)
// ESP32 HTTPS GET — 使用 WiFiClientSecure + 憑證指紋驗證
#include <WiFi.h>
#include <WiFiClientSecure.h>
#include <HTTPClient.h>

// 伺服器憑證 SHA-1 指紋(可用 openssl s_client 取得)
const char* fingerprint = "CF 05 98 6A 6D 44 9E 38 1C C2 88 5F 9A 3D 8B 5C 0C 6E E9 B7";

void httpsGet() {
    WiFiClientSecure client;
    client.setFingerprint(fingerprint);  // 憑證指紋驗證

    HTTPClient http;
    http.begin(client, "https://api.openweathermap.org/data/2.5/weather?q=Taipei&appid=YOUR_KEY");

    int httpCode = http.GET();
    if (httpCode == HTTP_CODE_OK) {
        Serial.println(http.getString());
    }
    http.end();
}
ESP-IDF:esp_http_client(原生高效能)
// ESP-IDF HTTP 用戶端範例
#include "esp_http_client.h"

esp_err_t _http_event_handler(esp_http_client_event_t *evt) {
    switch (evt->event_id) {
        case HTTP_EVENT_ON_DATA:
            // 接收資料回呼
            printf("Received %d bytes
", evt->data_len);
            break;
        case HTTP_EVENT_ON_FINISH:
            printf("HTTP 請求完成
");
            break;
        default:
            break;
    }
    return ESP_OK;
}

void esp_http_get_example(void) {
    esp_http_client_config_t config = {
        .url = "http://worldtimeapi.org/api/timezone/Asia/Taipei",
        .event_handler = _http_event_handler,
        .timeout_ms = 10000,
    };

    esp_http_client_handle_t client = esp_http_client_init(&config);
    esp_err_t err = esp_http_client_perform(client);

    if (err == ESP_OK) {
        printf("HTTP 狀態: %d
", esp_http_client_get_status_code(client));
        printf("Content-Length: %lld
", esp_http_client_get_content_length(client));
    }
    esp_http_client_cleanup(client);
}
HTTP POST:上傳資料到雲端

Arduino:POST JSON 到 Firebase
// ESP32 HTTP POST JSON — 上傳到 Firebase Realtime Database
#include <WiFi.h>
#include <HTTPClient.h>
#include <ArduinoJson.h>

const char* firebaseHost = "your-project.firebaseio.com";
const char* firebaseSecret = "YOUR_DATABASE_SECRET";

void postSensorData(float temp, float hum, float press) {
    if (WiFi.status() != WL_CONNECTED) return;

    HTTPClient http;

    // 建立 JSON
    StaticJsonDocument<256> doc;
    doc["temperature"] = temp;
    doc["humidity"]    = hum;
    doc["pressure"]    = press;
    doc["timestamp"]   = millis() / 1000;

    String jsonStr;
    serializeJson(doc, jsonStr);

    // 發送 POST
    String url = String("https://") + firebaseHost + "/sensors.json?auth=" + firebaseSecret;
    http.begin(url);
    http.addHeader("Content-Type", "application/json");

    int httpCode = http.POST(jsonStr);
    if (httpCode > 0) {
        Serial.printf("POST 成功,狀態碼: %d
", httpCode);
        Serial.println(http.getString());
    } else {
        Serial.printf("POST 失敗: %s
", http.errorToString(httpCode).c_str());
    }
    http.end();
}
POST multipart/form-data (檔案上傳)
// ESP32 HTTP POST multipart — 上傳圖片或二進位資料
#include <WiFi.h>
#include <HTTPClient.h>

void uploadPhoto(uint8_t* imageData, size_t imageLen) {
    HTTPClient http;
    http.begin("http://your-server.com/upload");

    // 設定 boundary
    String boundary = "----ESP32Boundary";
    http.addHeader("Content-Type", "multipart/form-data; boundary=" + boundary);

    // 建立 multipart body
    String bodyStart = "--" + boundary + "
";
    bodyStart += "Content-Disposition: form-data; name=\"file\"; filename=\"photo.jpg\"
";
    bodyStart += "Content-Type: image/jpeg

";

    String bodyEnd = "
--" + boundary + "--
";

    String totalBody = bodyStart + bodyEnd;
    int contentLen = bodyStart.length() + imageLen + bodyEnd.length();

    http.addHeader("Content-Length", String(contentLen));

    // 手動發送
    int httpCode = http.sendRequest("POST", totalBody.c_str());
    // 注意:對於大檔案,需使用 WiFiClient 分塊發送
    http.end();
}
JSON 解析(ArduinoJson)
// ESP32 使用 ArduinoJson 解析 API 回應
#include <ArduinoJson.h>
void parseWeatherResponse(String jsonResponse) {
// 靜態配置(較小檔案)
StaticJsonDocument<1024> doc;
DeserializationError error = deserializeJson(doc, jsonResponse);
if (error) {
Serial.printf("JSON 解析失敗: %s
", error.c_str());
return;
}
// 讀取值
const char* cityName = doc["name"]; // 城市名稱
float temp = doc["main"]["temp"]; // 溫度
float humidity = doc["main"]["humidity"]; // 濕度
int pressure = doc["main"]["pressure"]; // 氣壓
const char* weather = doc["weather"][0]["description"];// 天氣描述
float windSpeed = doc["wind"]["speed"]; // 風速
Serial.printf("城市: %s
", cityName);
Serial.printf("溫度: %.1f °C
", temp - 273.15);
Serial.printf("濕度: %.0f%%
", humidity);
Serial.printf("天氣: %s
", weather);
// 動態分配(較大 JSON 時使用)
// DynamicJsonDocument doc(4096);
// deserializeJson(doc, jsonResponse);
}
建構巢狀 JSON
// 建構複雜 JSON 結構
void buildComplexJSON() {
    StaticJsonDocument<512> doc;

    // 巢狀物件
    JsonObject device = doc.createNestedObject("device");
    device["id"]   = "ESP32-001";
    device["type"] = "environmental";
    device["ver"]  = "2.1.0";

    // 陣列
    JsonArray readings = doc.createNestedArray("readings");
    readings.add(millis() / 1000);

    // 巢狀陣列物件
    JsonObject r1 = readings.createNestedObject();
    r1["sensor"] = "bme280";
    r1["value"]  = 25.3;

    JsonObject r2 = readings.createNestedObject();
    r2["sensor"] = "mpu6050";
    r2["value"]  = 0.98;

    // 輸出
    String output;
    serializeJsonPretty(doc, output);
    Serial.println(output);
}
完整範例:定時上傳到 ThingSpeak
// ESP32 定時上傳感測器資料到 ThingSpeak
#include <WiFi.h>
#include <HTTPClient.h>

#define THINGSPEAK_API_KEY "YOUR_WRITE_API_KEY"
#define SEND_INTERVAL 60000  // 60 秒

unsigned long lastSend = 0;

void setup() {
    Serial.begin(115200);
    WiFi.begin("SSID", "PASSWORD");
    while (WiFi.status() != WL_CONNECTED) {
        delay(500);
    }
    Serial.println("WiFi 已連線");
}

void loop() {
    if (millis() - lastSend > SEND_INTERVAL) {
        // 讀取感測器(此處使用模擬值)
        float temp = 25.0 + random(-20, 20) / 10.0;
        float hum  = 60.0 + random(-50, 50) / 10.0;
        int light  = analogRead(34);

        if (WiFi.status() == WL_CONNECTED) {
            HTTPClient http;

            // ThingSpeak HTTP GET API(使用 GET 上傳)
            String url = "http://api.thingspeak.com/update?api_key=";
            url += THINGSPEAK_API_KEY;
            url += "&field1=" + String(temp, 1);
            url += "&field2=" + String(hum, 1);
            url += "&field3=" + String(light);

            http.begin(url);
            int httpCode = http.GET();

            if (httpCode == HTTP_CODE_OK) {
                String response = http.getString();
                Serial.printf("資料已上傳 (entry: %s)
", response.c_str());
            } else {
                Serial.printf("上傳失敗: %d
", httpCode);
            }
            http.end();
        }
        lastSend = millis();
    }
    delay(100);
}
延遲分析與最佳化
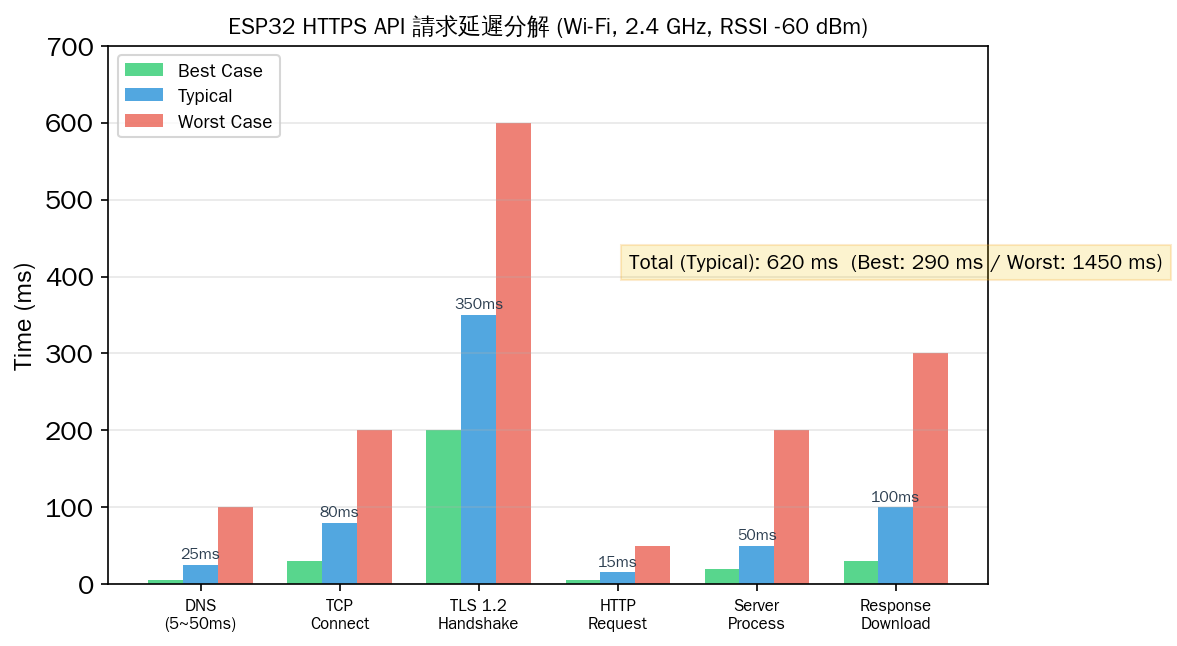
從延遲分解圖可以看出:
- TLS 握手 (200~600ms) 是最大的瓶頸,佔總時間 40~50%
- TCP 連線 (30~200ms) 受 Wi-Fi RSSI 影響顯著
- HTTP 請求/回應本身 (<50ms) 不是主要延遲來源
最佳化技巧
| 技術 | 做法 | 效果 |
|---|---|---|
| Keep-Alive | 重複使用 TCP 連線,避免每次重新握手 | 省 TCP + TLS 延遲 (200~800ms) |
| gzip 壓縮 | Accept-Encoding: gzip | 減少傳輸量 50~70% |
| 批次上傳 | 收集多筆資料一次 POST | 減少請求次數 10~60x |
| 非同步 HTTP | 使用 esp_http_client 的非同步模式 | 不阻塞主迴圈 |
| 降低 JSON 大小 | 縮短 key 名稱,刪除冗餘欄位 | 減少記憶體與傳輸量 |
| TLS Session 重用 | 儲存 Session ID/Ticket 跳過完整握手 | 省 1 RTT (50~300ms) |
常見問題與排查
| 問題 | 原因 | 解法 |
|---|---|---|
| WiFiClientSecure 連線失敗 | 根憑證未更新或指紋錯誤 | 更新 SHA-1 指紋,或使用 setInsecure() 測試 |
| ESP32 重啟 | 記憶體不足 (OOM) | 降低 JSON buffer,使用 DynamicJsonDocument |
| HTTP POST 無回應 | Content-Length 未正確設定 | 手動計算 body 長度並設定 |
| TLS 握手 timeout | Wi-Fi RSSI 太弱 | 改善天線位置,或改用 HTTP |
| HTTPS 憑證驗證失敗 | ESP32 時鐘未同步 | 使用 NTP 同步時間再進行 TLS |
| 請求間距過短 | API rate limit | 增加 delay 或實作指數退避 |
| JSON 解析亂碼 | 編碼不符 UTF-8 | 確保 API 回應為 UTF-8 編碼 |
NTP 時鐘同步(HTTPS 必要)
// HTTPS 需要正確的系統時間驗證憑證
#include "esp_sntp.h"
#include "esp_log.h"

void syncTime() {
    sntp_setoperatingmode(SNTP_OPMODE_POLL);
    sntp_setservername(0, "pool.ntp.org");
    sntp_init();

    // 等待時間同步
    time_t now = 0;
    int retry = 0;
    while (now < 100000 && retry < 20) {
        delay(1000);
        time(&now);
        retry++;
    }

    if (retry < 20) {
        struct tm timeinfo;
        localtime_r(&now, &timeinfo);
        printf("時間已同步: %s
", asctime(&timeinfo));
    } else {
        printf("NTP 同步失敗
");
    }
}
TLS Session 重用(效能最佳化)
// 啟用 TLS Session Cache 加速後續 HTTPS 請求
#include <WiFiClientSecure.h>

WiFiClientSecure client;
static const char* caCert = "-----BEGIN CERTIFICATE-----
...";

void setup_https_client() {
    client.setCACert(caCert);

    // 啟用 Session Cache
    // 儲存在 mbedTLS 的 Session Cache 中
    // 第二次連線將跳過 Certificate + ServerKeyExchange
    // 節省約 1 RTT (100~300ms)
}

void reuse_https_get() {
    // 第一次呼叫:完整握手(~500ms)
    // 第二次呼叫:Session 重用(~200ms)
    if (!client.connected()) {
        client.connect("api.example.com", 443);
    }

    client.println("GET /data HTTP/1.1");
    client.println("Host: api.example.com");
    client.println("Connection: keep-alive");
    client.println();
}
總結
ESP32 的 HTTP/HTTPS 用戶端能力使其能無縫接入現代雲端生態系。從簡單的 GET 請求到 TLS 加密的 POST JSON 上傳,ESP32 提供了 Arduino HTTPClient 到 ESP-IDF esp_http_client 的多層 API 選擇。
選型參考:
- 簡單資料上傳:Arduino HTTPClient + ThingSpeak GET API(最簡)
- 安全傳輸:WiFiClientSecure + HTTPS + 憑證指紋驗證
- 高效能量產:ESP-IDF esp_http_client + event callback
- 大量資料上傳:批次收集 + 定時 POST + gzip 壓縮
- 即時雙向通訊:WebSocket 或 MQTT over TLS

文章評論