ESP32 SD 卡讀寫:SPI 與 SDMMC 模式完整教學
SD 卡是 IoT 設備最常用的資料儲存方案,可用於感測器資料記錄(Data Logging)、韌體更新檔案儲存、多媒體檔案存放等。ESP32 支援 兩種 SD 卡通訊模式:SPI 模式與 SDMMC 模式,各有優缺點。
本文將深入探討:
- SD 卡 SPI 初始化序列與通訊協定
- 區塊讀取(CMD17)與區塊寫入(CMD24)時序
- ESP32 Arduino SD.h 與 SD_MMC.h 程式設計
- FAT32 檔案系統操作(建立、讀寫、刪除)
- CSV 資料記錄(Data Logging)實戰
- SPI vs SDMMC 效能比較
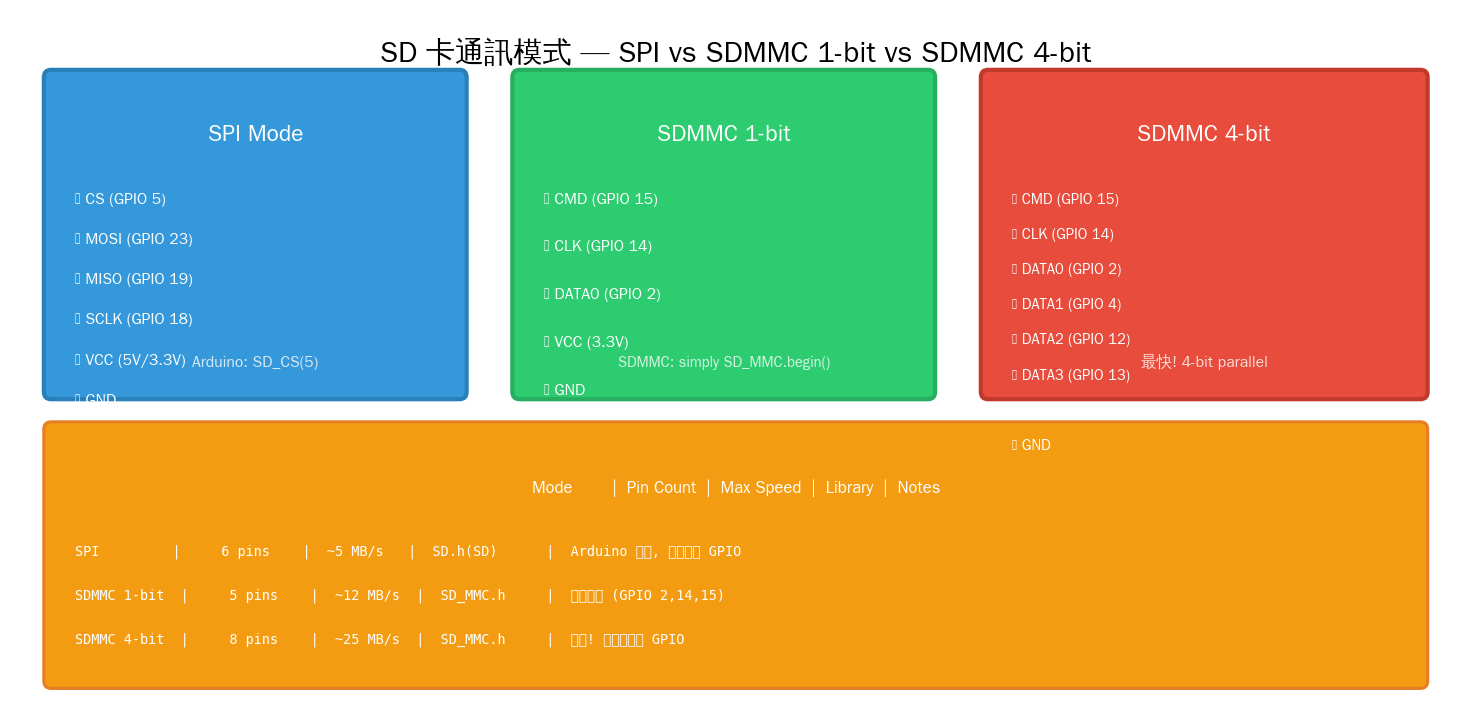
SD 卡通訊模式
SPI 初始化序列
SD 卡在 SPI 模式下的初始化流程是固定的,必須按照以下順序操作:
- 延遲 ≥ 74 CLK:上電後先給 74 個空時脈讓 SD 卡內部電壓穩定
- CMD0 (GO_IDLE):重置信卡,進入 SPI 模式
- CMD8 (SEND_IF_COND):檢查 SD 卡版本與電壓範圍(2.7~3.6V)
- CMD58 (READ_OCR):讀取 OCR 暫存器確認電壓支援
- ACMD41 (SD_SEND_OP_COND):啟動初始化並等待卡就緒(HCS=1 表示支援 SDHC)
- CMD2 (ALL_SEND_CID):取得卡片識別碼
- CMD3 (SEND_REL_ADDR):取得相對位址(RCA)
- CMD7 (SELECT/DESELECT_CARD):選擇卡片進入傳輸狀態
- 初始化後可將時脈提高到 20~40 MHz

區塊讀取時序

區塊寫入時序

Arduino 程式設計
SPI 模式:基本讀寫
// ESP32 SD 卡 SPI 模式 — 基本讀寫
#include <SD.h>
#include <SPI.h>

#define SD_CS  5   // Chip Select (GPIO 5)

void setup() {
    Serial.begin(115200);

    // 初始化 SD 卡 (SPI 模式)
    if (!SD.begin(SD_CS)) {
        Serial.println("SD 卡初始化失敗!");
        Serial.println("請檢查:");
        Serial.println("  1. 接線是否正確");
        Serial.println("  2. SD 卡是否格式化為 FAT32");
        Serial.println("  3. CS 腳位是否正確");
        return;
    }
    Serial.println("SD 卡初始化成功!");
}

void loop() {
    // === 寫入檔案 ===
    File dataFile = SD.open("/test.txt", FILE_WRITE);
    if (dataFile) {
        dataFile.println("Hello from ESP32!");
        dataFile.printf("Timestamp: %lu
", millis() / 1000);
        dataFile.close();
        Serial.println("寫入成功!");
    } else {
        Serial.println("開啟檔案失敗(寫入)");
    }

    // === 讀取檔案 ===
    File readFile = SD.open("/test.txt");
    if (readFile) {
        Serial.println("=== 檔案內容 ===");
        while (readFile.available()) {
            Serial.write(readFile.read());
        }
        readFile.close();
        Serial.println("=== 結束 ===");
    }

    delay(5000);
}
CSV 感測器資料記錄(Data Logging)
// ESP32 SD 卡 CSV 資料記錄器
#include <SD.h>
#include <SPI.h>
#include "RTClib.h"  // 選用:DS3231 RTC 模組

#define SD_CS 5

RTC_DS3231 rtc;
File logFile;

void setup() {
    Serial.begin(115200);

    // 初始化 RTC(選用)
    if (!rtc.begin()) {
        Serial.println("RTC 未找到,將使用 millis() 時間戳");
    }

    if (!SD.begin(SD_CS)) {
        Serial.println("SD 卡初始化失敗!");
        return;
    }

    // 檢查檔案是否存在,若不存在則寫入標題行
    if (!SD.exists("/sensor.csv")) {
        logFile = SD.open("/sensor.csv", FILE_WRITE);
        if (logFile) {
            logFile.println("timestamp,temp,hum,pressure,light");
            logFile.close();
        }
    }

    Serial.println("SD 卡資料記錄器已啟動");
}

void logData(float temp, float hum, float press, int light) {
    logFile = SD.open("/sensor.csv", FILE_APPEND);  // 附加模式
    if (!logFile) {
        Serial.println("開啟記錄檔失敗!");
        return;
    }

    // 時間戳
    unsigned long ts;
    if (rtc.begin()) {
        DateTime now = rtc.now();
        logFile.printf("%04d-%02d-%02d %02d:%02d:%02d,",
            now.year(), now.month(), now.day(),
            now.hour(), now.minute(), now.second());
    } else {
        logFile.printf("%lu,", millis() / 1000);
    }

    // 感測器資料
    logFile.printf("%.1f,%.1f,%.1f,%d
", temp, hum, press, light);
    logFile.close();
}

void loop() {
    // 模擬感測器資料
    float t = 25.0 + random(-20, 20) / 10.0;
    float h = 60.0 + random(-50, 50) / 10.0;
    float p = 1013.0 + random(-30, 30) / 10.0;
    int   l = analogRead(34);

    logData(t, h, p, l);
    Serial.printf("Logged: %.1f %.1f %.1f %d
", t, h, p, l);

    delay(60000);  // 每分鐘記錄一筆
}
檔案管理:列出所有檔案
// 列出 SD 卡根目錄所有檔案與大小
void printDirectory(File dir, int numTabs) {
    while (true) {
        File entry = dir.openNextFile();
        if (!entry) break;

        for (uint8_t i = 0; i < numTabs; i++) Serial.print("	");
        Serial.print(entry.name());

        if (entry.isDirectory()) {
            Serial.println("/");
            printDirectory(entry, numTabs + 1);
        } else {
            Serial.printf("	%lu bytes
", entry.size());
        }
        entry.close();
    }
}

void listRoot() {
    File root = SD.open("/");
    if (root) {
        printDirectory(root, 0);
        root.close();
    }
}
SDMMC 4-bit 模式(最快)
// ESP32 SDMMC 4-bit 模式
// 注意!SDMMC 模式使用固定腳位,不可更改!
#include "SD_MMC.h"

void setup() {
    Serial.begin(115200);

    // SDMMC 4-bit 模式初始化
    if (!SD_MMC.begin()) {
        Serial.println("SDMMC 初始化失敗!");
        Serial.println("請檢查:");
        Serial.println("  CMD  → GPIO 15");
        Serial.println("  CLK  → GPIO 14");
        Serial.println("  DATA0 → GPIO 2");
        Serial.println("  DATA1 → GPIO 4");
        Serial.println("  DATA2 → GPIO 12");
        Serial.println("  DATA3 → GPIO 13");
        return;
    }

    Serial.println("SDMMC 模式初始化成功!");

    // 讀寫測試
    File f = SD_MMC.open("/speed.txt", FILE_WRITE);
    if (f) {
        // 寫入 1MB 測試資料
        uint8_t buf[512];
        memset(buf, 0xAA, 512);
        unsigned long start = micros();
        for (int i = 0; i < 2048; i++) {
            f.write(buf, 512);
        }
        f.close();
        unsigned long elapsed = micros() - start;
        float speed = (1024.0 * 1024.0) / elapsed;
        Serial.printf("1MB 寫入耗時: %.2f s  (%.2f MB/s)
",
            elapsed / 1e6, speed);
    }
}
二進位資料記錄(高效)
// ESP32 二進位資料記錄 — 更小更快
struct SensorRecord {
    uint32_t timestamp;
    float    temperature;
    float    humidity;
    float    pressure;
    uint16_t light;
    uint16_t crc;  // 簡單校驗
};

void logBinaryRecord(File &file, const SensorRecord &rec) {
    // 直接寫入結構體(二進位)
    file.write((uint8_t*)&rec, sizeof(SensorRecord));
}

void readBinaryRecords(File &file) {
    SensorRecord rec;
    while (file.read((uint8_t*)&rec, sizeof(SensorRecord)) == sizeof(SensorRecord)) {
        // 處理每筆記錄
        Serial.printf("%u: %.1f C, %.1f %%
",
            rec.timestamp, rec.temperature, rec.humidity);
    }
}
效能測試
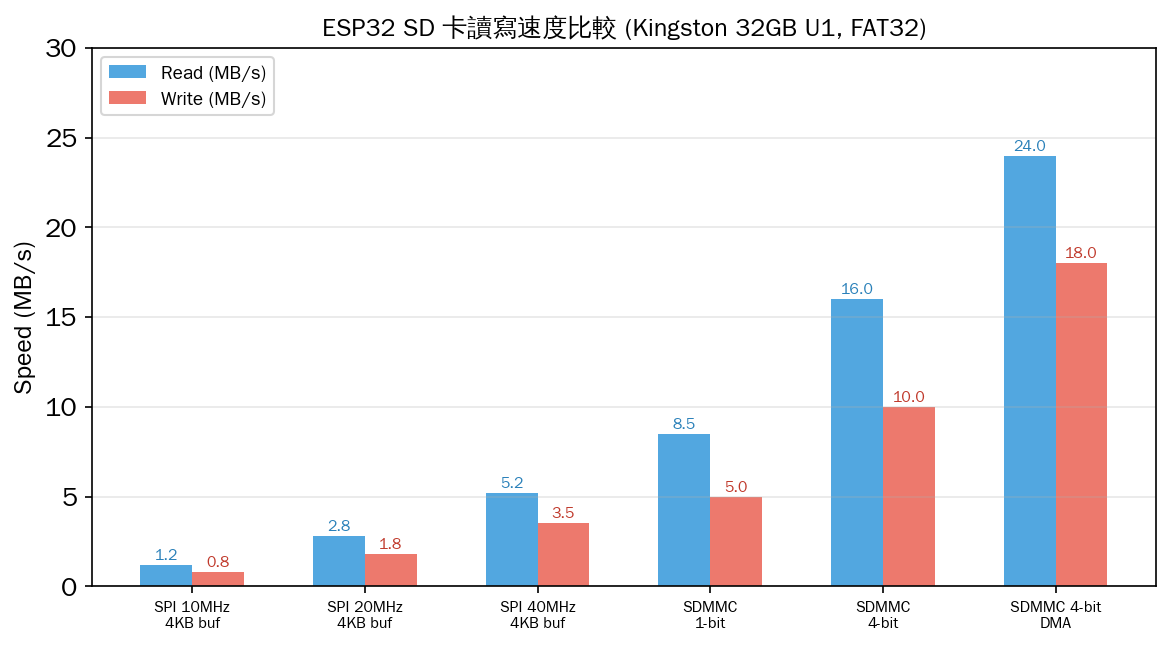
測試結果總結:
- SPI 40 MHz:讀取 5.2 MB/s,寫入 3.5 MB/s(足夠一般日誌記錄)
- SDMMC 4-bit:讀取 16 MB/s,寫入 10 MB/s(適合高速資料串流)
- SDMMC 4-bit + DMA:讀取 24 MB/s,寫入 18 MB/s(極速!)
- 寫入比讀取慢約 30~40%,因為寫入後需要等待 Flash 燒錄
常見問題與排查
| 問題 | 原因 | 解法 |
|---|---|---|
| SD.begin() 失敗 | CS 腳位錯誤或初始化時脈太快 | 確認 CS 腳位,在 begin() 前降低 SPI 時脈 |
| 卡片無法掛載 | 未格式化為 FAT32 | 使用 SDFormatter 工具格式化 |
| SPI 模式 CS 須專用 | 其他 SPI 裝置共用 CS 會衝突 | 設定 SPI.setCSActiveLevel() 或使用獨立 CS |
| SDMMC 不穩定 | GPIO 12 上拉電阻衝突 | GPIO 12 為 MTDI 腳,需注意外部上拉 |
| 寫入速度慢 | 單筆寫入無緩衝 | 使用 file.write(buf, size) 批次寫入 |
| 檔案損毀 | 寫入中斷電或未 close() | 確保 close(),使用 UPS 或大電容 |
| 2GB 以上無法使用 | 僅支援 FAT32 | SDHC/SDXC 需 FAT32 格式化(不能 exFAT) |
| SPI 模式讀不到 SDHC | ACMD41 未設 HCS=1 | Arduino SD.h 已處理,但自訂實作需注意 |
SDMMC 腳位衝突
| SDMMC 腳位 | GPIO | 衝突周邊 | 解決方案 |
|---|---|---|---|
| CMD | 15 | RTC 時脈輸出 | 上拉電阻 10kΩ |
| CLK | 14 | TMS (JTAG) | SDMMC 模式下不可使用 JTAG |
| DATA0 | 2 | 內建 LED | 可使用,但 LED 會閃爍 |
| DATA1 | 4 | 觸摸感測器 T0 | 不可同時使用 T0 觸摸 |
| DATA2 | 12 | MTDI(決定 Flash 電壓) | 注意:GPIO 12 外部不可接上拉!否則會使 Flash 進入 1.8V 模式 |
| DATA3 | 13 | 一般 GPIO | 無衝突 |
SPI 模式也支援 SDHC
// ESP32 SD 卡 SPI 模式 — 手動設定 SPI 時脈
#include <SD.h>
#include <SPI.h>

#define SD_CS 5

void setup() {
    Serial.begin(115200);

    // 手動設定 SPI 參數
    SPI.begin(18, 19, 23, 5);  // SCK, MISO, MOSI, CS
    SPIClass spi = SPI;
    spi.beginTransaction(SPISettings(20000000, MSBFIRST, SPI_MODE0));

    if (!SD.begin(SD_CS, spi, 20000000)) {
        Serial.println("初始化失敗,降低時脈重試...");
        if (!SD.begin(SD_CS, spi, 1000000)) {
            Serial.println("仍然失敗!");
            return;
        }
    }

    Serial.println("SD 卡初始化成功!");
    Serial.printf("卡片容量: %llu MB
",
        SD.cardSize() / (1024 * 1024));
    Serial.printf("總空間: %llu MB
",
        SD.totalBytes() / (1024 * 1024));
    Serial.printf("已用空間: %llu MB
",
        SD.usedBytes() / (1024 * 1024));
}
ESP-IDF 原生 fatfs
// ESP-IDF SD 卡範例 (SPI 模式)
#include "esp_vfs_fat.h"
#include "sdmmc_cmd.h"
#include "driver/sdspi_host.h"

void app_main(void) {
    esp_vfs_fat_sdmmc_mount_config_t mount_config = {
        .format_if_mount_failed = false,
        .max_files = 5,
        .allocation_unit_size = 16 * 1024
    };

    sdmmc_card_t *card;
    const char mount_point[] = "/sdcard";

    esp_err_t ret = esp_vfs_fat_sdmmc_mount(
        mount_point, &mount_config, sdmmc_host, &slot_config, &card);

    if (ret != ESP_OK) {
        ESP_LOGE("SD", "Mount failed: %s", esp_err_to_name(ret));
        return;
    }

    sdmmc_card_print_info(stdout, card);

    // 讀寫檔案
    FILE *f = fopen("/sdcard/hello.txt", "w");
    fprintf(f, "Hello from ESP-IDF!");
    fclose(f);

    // 卸載
    esp_vfs_fat_sdmmc_unmount(mount_point, card);
}
總結
ESP32 的 SD 卡支援涵蓋了從低腳位 SPI 模式到高效能 SDMMC 4-bit DMA 模式的完整光譜,無論是簡易資料記錄還是高速多媒體串流都有對應方案。
選型參考:
- 簡單日誌記錄 (1 KB/s):SPI 模式,僅需 6 條線,可用任何 GPIO
- 高速感測器資料流 (100 KB/s):SPI 40 MHz + 512 bytes 批次寫入
- 音頻/影像記錄 (1 MB/s):SDMMC 1-bit 模式,最少 5 條線
- 高速串流 (10 MB/s+):SDMMC 4-bit + DMA,最佳效能但需注意腳位衝突
- 跨平台相容:使用 FAT32 格式化,Windows/Mac/Linux 可直接讀取

文章評論