前言
FreeRTOS 多工管理是嵌入式系統中最廣泛使用的即時作業系統(RTOS),STM32 的 HAL 庫內建 CMSIS-RTOS 封裝層,ESP32 的 ESP-IDF 更是直接基於 FreeRTOS 作為原生執行環境。不論你用哪個平台,理解 FreeRTOS 的核心機制——任務排程、佇列通訊、信號量同步和中斷管理——都是開發穩定多工系統的關鍵。本文將從任務狀態機講到實戰程式碼,一次打通 RTOS 開發的任督二脈。
一、為什麼需要 RTOS?
傳統前後台系統(Super Loop)在單一任務時很好用,但當系統需要同時處理 Wi-Fi 連線、感測器讀取、按鍵掃描和螢幕更新時,輪詢式的 while(1) 很快就會讓某個任務被 Block 住。RTOS 提供了:
- 多工並行:多個任務看似同時執行
- 優先級排程:重要任務優先處理
- 同步機制:Queue、Semaphore、Mutex 讓任務安全溝通
- 模組化:每個功能獨立成任務,降低耦合
以 ESP32 為例,開機後已經有 11 個系統任務在執行(Wi-Fi、TCP/IP、Timer、IPC 等),你的應用任務只是其中之一。
二、任務(Task)管理
2.1 任務狀態機
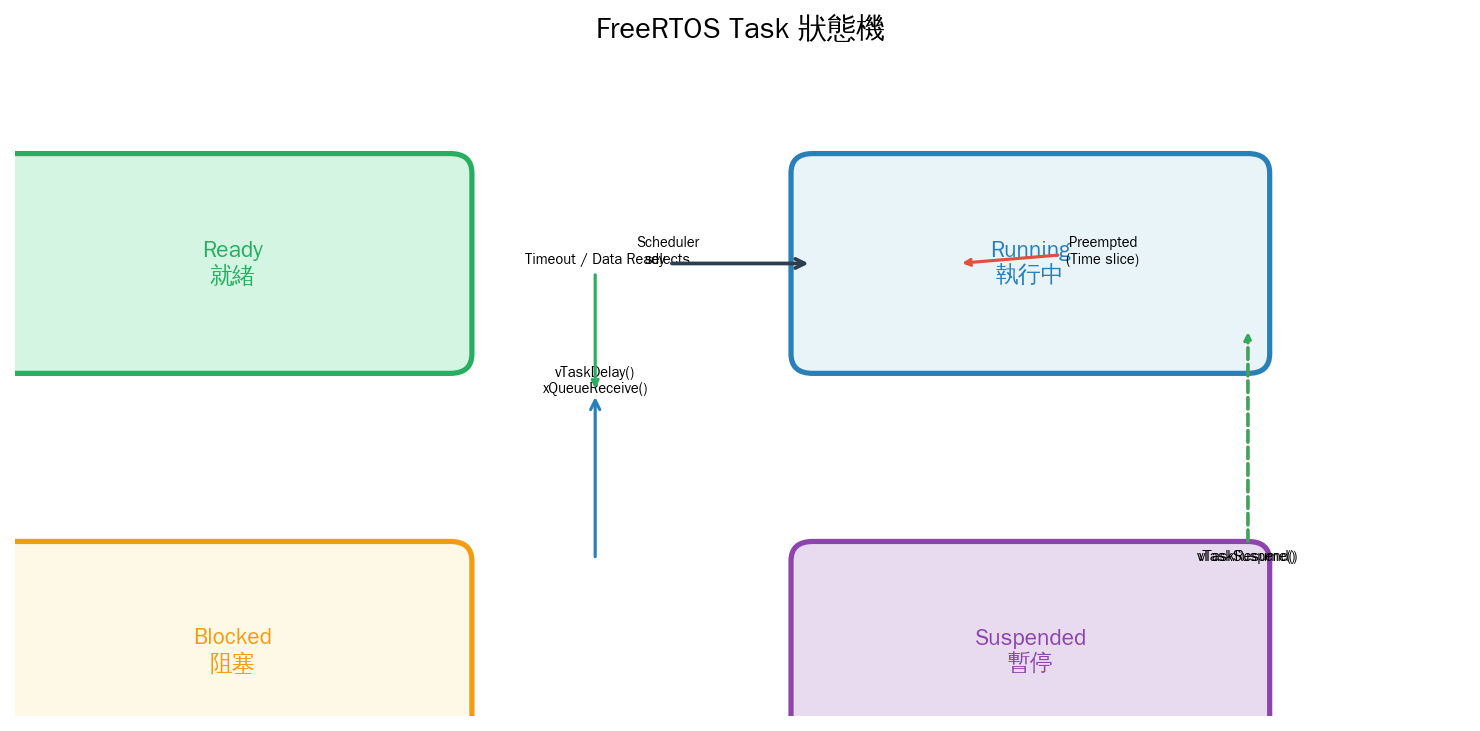
圖 3:FreeRTOS Task 狀態機 — 四個核心狀態:Ready、Running、Blocked、Suspended。
- Ready(就緒):任務可以執行,等待調度器選擇
- Running(執行中):正在使用 CPU
- Blocked(阻塞):等待某個事件(Timeout、Queue、Semaphore)
- Suspended(暫停):被 vTaskSuspend() 暫停,需 vTaskResume() 恢復
2.2 創建任務
ESP-IDF(原生 FreeRTOS API):
#include "freertos/FreeRTOS.h"
#include "freertos/task.h"

static void sensor_task(void *pvParameters)
{
    while (1) {
        read_sensor();
        vTaskDelay(pdMS_TO_TICKS(100));  // 100ms 一次
    }
}

void app_main(void)
{
    xTaskCreate(
        sensor_task,        // 任務函數
        "sensor_task",      // 名稱 (除錯用)
        4096,               // Stack 大小 (bytes)
        NULL,               // 參數
        5,                  // 優先級 (0~configMAX_PRIORITIES-1)
        NULL                // Task handle (可選)
    );
}
STM32 + CMSIS-RTOS(FreeRTOS 封裝):
#include "cmsis_os.h"

void sensor_task(void const *argument)
{
    while (1) {
        read_sensor();
        osDelay(100);  // 100ms
    }
}

osThreadDef(sensor_task, osPriorityNormal, 1, 1024, NULL);

int main(void)
{
    HAL_Init();
    // ...
    osThreadCreate(osThread(sensor_task), NULL);
    osKernelStart();  // 啟動調度器
    while (1);
}
2.3 任務優先級與搶佔

圖 1:FreeRTOS 搶佔式排程 — 高優先級 Task A 搶佔低優先級 Task B;ISR 觸發後喚醒 Task A。
FreeRTOS 使用搶佔式優先級排程(Preemptive Priority Scheduling):
- 高優先級任務就緒時,立即搶佔低優先級任務
- 同等優先級採用時間片輪轉(Round-Robin Time Slicing)
- 優先級數:0(最低)~ configMAX_PRIORITIES-1(最高)
- ESP32 預設 configMAX_PRIORITIES = 25
實務建議:優先級不是越多越好,3~5 個層級通常就夠了:
// 常用優先級分層
#define PRIO_ISR_HANDLER   10  // 硬即時任務
#define PRIO_CONTROL        8  // 控制迴路 (PID)
#define PRIO_COMM           5  // 通訊任務
#define PRIO_SENSOR         3  // 感測器讀取
#define PRIO_DISPLAY        1  // 顯示/除錯
三、Queue(佇列)— 任務間通信
Queue 是 FreeRTOS 中最基礎的 IPC(行程間通訊)機制。Task A 可以把資料放入 Queue,Task B 可以取出。Queue 是先進先出(FIFO)結構。

圖 2:Queue 資料流 — Sender 寫入 Queue,Receiver 阻塞等待直到資料到達。
3.1 基本 Queue 操作
#include "freertos/FreeRTOS.h"
#include "freertos/task.h"
#include "freertos/queue.h"

QueueHandle_t sensor_queue;

// 資料結構
typedef struct {
    float temperature;
    float humidity;
    uint32_t timestamp;
} SensorData;

void sender_task(void *pvParam)
{
    SensorData data;
    while (1) {
        data.temperature = read_temp();
        data.humidity    = read_humidity();
        data.timestamp   = millis();

        // 發送資料(若 queue 滿,等 portMAX_DELAY)
        xQueueSend(sensor_queue, &data, portMAX_DELAY);
        vTaskDelay(pdMS_TO_TICKS(1000));
    }
}

void receiver_task(void *pvParam)
{
    SensorData data;
    while (1) {
        // 接收資料(若 queue 空,阻塞等待)
        if (xQueueReceive(sensor_queue, &data, portMAX_DELAY) == pdPASS)
        {
            printf("Temp: %.1f, Hum: %.1f\n", data.temperature, data.humidity);
        }
    }
}

void app_main(void)
{
    // 創建 queue:每個元素 sizeof(SensorData),最多 10 個
    sensor_queue = xQueueCreate(10, sizeof(SensorData));

    xTaskCreate(sender_task,   "sender",   2048, NULL, 5, NULL);
    xTaskCreate(receiver_task, "receiver", 2048, NULL, 5, NULL);
}
3.2 Queue 超時處理
// 阻塞最多 100ms,若無資料則繼續執行
if (xQueueReceive(queue, &data, pdMS_TO_TICKS(100)) == pdPASS)
{
    process_data(&data);
}
else
{
    // Timeout,做其他事
    check_watchdog();
}
四、Semaphore(信號量)與 Mutex
4.1 Binary Semaphore(二值信號量)
Binary Semaphore 最常見的用法是中斷同步——ISR 通知任務執行耗時操作:
SemaphoreHandle_t sem;

void IRAM_ATTR gpio_isr_handler(void *arg)
{
    BaseType_t wake = pdFALSE;
    xSemaphoreGiveFromISR(sem, &wake);
    if (wake) portYIELD_FROM_ISR();
}

void sensor_task(void *pvParam)
{
    while (1) {
        if (xSemaphoreTake(sem, portMAX_DELAY) == pdPASS)
        {
            // ISR 觸發後執行
            uint32_t val = read_adc();
            process_adc(val);
        }
    }
}

void app_main(void)
{
    sem = xSemaphoreCreateBinary();
    xTaskCreate(sensor_task, "sensor", 2048, NULL, 10, NULL);

    gpio_set_intr_type(GPIO_NUM_34, GPIO_INTR_POSEDGE);
    gpio_install_isr_service(0);
    gpio_isr_handler_add(GPIO_NUM_34, gpio_isr_handler, NULL);
}
4.2 Counting Semaphore(計數信號量)
Counting Semaphore 用於管理有限數量的資源(如記憶體池、連線槽):
SemaphoreHandle_t pool_sem;

#define POOL_SIZE 5

void worker_task(void *pvParam)
{
    int id = (int)pvParam;
    while (1) {
        // 取得資源
        if (xSemaphoreTake(pool_sem, pdMS_TO_TICKS(5000)) == pdPASS)
        {
            printf("Worker %d acquired resource\n", id);
            vTaskDelay(pdMS_TO_TICKS(2000 + rand() % 3000));
            xSemaphoreGive(pool_sem);  // 釋放資源
        }
        else
        {
            printf("Worker %d timeout!\n", id);
        }
    }
}

void app_main(void)
{
    pool_sem = xSemaphoreCreateCounting(POOL_SIZE, POOL_SIZE);
    for (int i = 0; i < 8; i++)
        xTaskCreate(worker_task, "worker", 2048, (void *)i, 5, NULL);
}
4.3 Mutex(互斥鎖)與 Priority Inheritance
Mutex 用於保護共用資源(全域變數、硬體周邊),與 Binary Semaphore 最大的不同是支援優先級繼承(Priority Inheritance)解決優先級反轉問題。
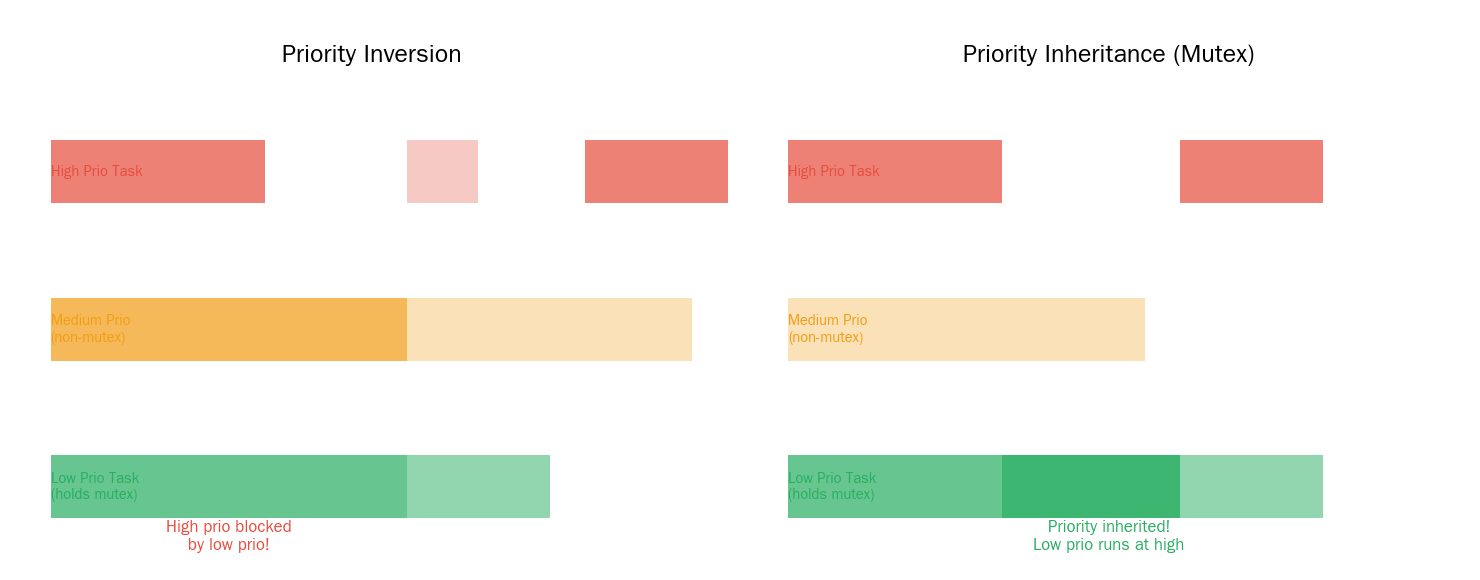
圖 4:Priority Inversion vs Priority Inheritance — 左圖:高優先級任務被低優先級任務阻塞(反轉);右圖:Mutex 讓低優先級繼承高優先級,快速釋放鎖。
SemaphoreHandle_t mutex;
int shared_data = 0;

void writer_task(void *pvParam)
{
    while (1) {
        xSemaphoreTake(mutex, portMAX_DELAY);
        shared_data = read_sensor();
        xSemaphoreGive(mutex);
        vTaskDelay(pdMS_TO_TICKS(100));
    }
}

void reader_task(void *pvParam)
{
    while (1) {
        xSemaphoreTake(mutex, portMAX_DELAY);
        int val = shared_data;
        xSemaphoreGive(mutex);
        printf("Value: %d\n", val);
        vTaskDelay(pdMS_TO_TICKS(50));
    }
}

void app_main(void)
{
    mutex = xSemaphoreCreateMutex();  // 使用 Mutex (含 Priority Inheritance)
    xTaskCreate(writer_task, "writer", 2048, NULL, 3, NULL);
    xTaskCreate(reader_task, "reader", 2048, NULL, 5, NULL);
}
五、Task Notification(任務通知)
FreeRTOS 的 Task Notification 比 Semaphore 更快(不需要額外的 queue/semaphore 物件):
TaskHandle_t worker_handle;

void worker(void *pvParam)
{
    uint32_t val;
    while (1) {
        // 阻塞等待通知
        xTaskNotifyWait(0, ULONG_MAX, &val, portMAX_DELAY);
        printf("Received: %lu\n", val);
    }
}

void app_main(void)
{
    xTaskCreate(worker, "worker", 2048, NULL, 5, &worker_handle);

    // 從 ISR 或另一個任務發送通知
    xTaskNotify(worker_handle, 0x42, eSetValueWithOverwrite);
}
Task Notification 性能對比:
| 機制 | RAM 開銷 | 速度 | 適用場景 |
|---|---|---|---|
| Queue | Queue 結構 + Buffer | 慢 | 傳送大量資料 |
| Semaphore | 約 60 bytes | 中 | 事件通知、資源計數 |
| Mutex | 約 80 bytes | 中 | 共享資源保護 |
| Task Notification | 0(內建於 TCB) | 快 (快 45%) | 簡單事件通知 |
六、實戰專案:多感測器資料採集系統
整合上述機制,實作一個完整的 IoT 資料採集系統:
// ┌─────────────┐    Queue     ┌──────────────┐    UDP     ┌──────┐
// │ Sensor Task  │────data────→│ Network Task  │───────→│ Server │
// │   (Prio 3)   │             │   (Prio 5)    │         │Port  │
// └──────┬───────┘             └──────┬───────────┘         └──────┘
//        │ ISR notification           │
//   ┌────▼───┐                 ┌──────▼───────┐
//   │ Button │                 │ OLED Display │
//   │  ISR   │                 │  (Prio 1)    │
//   └────────┘                 └──────────────┘
SemaphoreHandle_t button_sem;
QueueHandle_t data_queue;
TaskHandle_t sensor_handle;
TaskHandle_t network_handle;
TaskHandle_t display_handle;
// Button ISR
void IRAM_ATTR button_isr(void *arg)
{
BaseType_t w = pdFALSE;
xSemaphoreGiveFromISR(button_sem, &w);
if (w) portYIELD_FROM_ISR();
}
// Sensor Task
void sensor_task(void *pv)
{
while (1) {
xSemaphoreTake(button_sem, portMAX_DELAY);
SensorData d;
d.temp = read_ds18b20();
d.hum = read_dht22();
d.ts = esp_timer_get_time();
xQueueSend(data_queue, &d, pdMS_TO_TICKS(10));
}
}
// Network Task (Wi-Fi + UDP)
void network_task(void *pv)
{
SensorData d;
while (1) {
if (xQueueReceive(data_queue, &d, pdMS_TO_TICKS(1000)) == pdPASS)
{
char buf[128];
snprintf(buf, sizeof(buf),
"{"t":%.1f,"h":%.1f,"ts":%lu}",
d.temp, d.hum, d.ts);
udp_send(buf);
}
}
}
// Display Task
void display_task(void *pv)
{
SensorData d;
while (1) {
if (xQueuePeek(data_queue, &d, 0) == pdPASS)
{
oled_printf(0, "T: %.1f C", d.temp);
oled_printf(1, "H: %.1f %%", d.hum);
}
vTaskDelay(pdMS_TO_TICKS(500));
}
}
void app_main(void)
{
button_sem = xSemaphoreCreateBinary();
data_queue = xQueueCreate(5, sizeof(SensorData));
gpio_isr_handler_add(BTN_PIN, button_isr, NULL);
xTaskCreate(sensor_task, "sensor", 2048, NULL, 3, &sensor_handle);
xTaskCreate(network_task, "network", 4096, NULL, 5, &network_handle);
xTaskCreate(display_task, "display", 2048, NULL, 1, &display_handle);
}七、常見問題與除錯
7.1 Stack Overflow
任務的 Stack 大小不足是 RTOS 最常見的崩潰原因。解決方案:
// 在 FreeRTOSConfig.h 啟用 Stack Overflow 檢測
#define configCHECK_FOR_STACK_OVERFLOW  2

// 註冊掛鉤函數
void vApplicationStackOverflowHook(TaskHandle_t xTask, char *pcTaskName)
{
    printf("STACK OVERFLOW: %s\n", pcTaskName);
    while(1);
}
7.2 Deadlock(死鎖)
兩個任務互相等待對方釋放的資源。避免方法:
- 所有任務依相同順序取得 Mutex(A → B → C)
- 使用 xSemaphoreTake() 加上 Timeout,不要用 portMAX_DELAY
- 考慮使用 Queue 替代複雜的 Mutex 嵌套
7.3 Priority Inversion(優先級反轉)
使用 Mutex(而不是 Binary Semaphore)來保護資源,因為 Mutex 支援優先級繼承。
7.4 記憶體耗盡
// 檢查剩餘 heap
printf("Free heap: %d\n", esp_get_free_heap_size());
printf("Min free:  %d\n", esp_get_minimum_free_heap_size());

// 使用 xTaskCreateStatic() 預分配 Stack
八、總結
FreeRTOS 的多工管理是嵌入式系統開發的核心技能。不論你的目標平台是 STM32 還是 ESP32,理解任務狀態機、Queue、Semaphore、Mutex 和 Task Notification 的差異,就能設計出穩定且高效的系統架構。實戰中的幾個原則:
- 優先級盡量少:3~5 個層級足以應付大多數場景
- ISR 盡量短:只在 ISR 中發送 Semaphore/Notification,耗時操作交給任務
- Queue 比全域變數安全:用 Queue 而不是直接讀寫共用變數
- Mutex 保護共用資源:使用 Mutex(非 Binary Semaphore)避免優先級反轉
- 監控 Stack:啟用 Stack Overflow 檢測,定期檢查 Heap 剩餘量

文章評論